Configuring the IDE
On this page we only discuss configuration that aims to deal with non-standard React Native project setups. If your project has diverged from the Expo or React Native community CLI template, and it doesn't build or run correctly within the IDE, you may need to look into the available options documented below.
When building the IDE, our approach was always to try and deal with different configurations automatically, without user input. However, due to the spectrum of possible modifications to React Native project setups, it is very difficult to do that in some cases. We constantly look into ways of improving things, so if the IDE doesn't work for your setup, please report an issue with a sample project that reproduces the setup that you use. While some project setups (like brownfield projects) are more challenging than others, we want the IDE to be universally available for all types of React Native projects and will investigate the possibilities of expanding configuration options or handling some project modifications in an automated way.
Managing configurations
Radon IDE uses the standard VS Code launch.json format for customizing the build process to your project.
Before you can change any of the options you'll need to create a launch configuration file, unless you already have one in your project.
Creating and updating launch.json using Radon IDE's panel
In order to create a new project configuration, open Launch Configuration Selector and select Add custom launch config option. The wizard will guide you through configuring the options in a GUI environment.

The wizard provides simple means to generate and edit launch.json. If necessary, you can use the Edit in launch.json button to jump to the file itself and make changes manually.
After filling out the options, click the Save button to create the launch.json configuration file (if it does not exist yet) and write your launch configuration to it. You can then select created configuration from the Launch Configuration Selector.
You should consider adding the launch.json file to your project's version control system (e.g. git) as it carries configuration that is specific to your project setup rather than user specific editor settings.

You can edit or delete existing custom launch configuration by clicking on the cog icon next to its name in Launch Configuration Selector.

Creating launch.json using VS Code's Debug Panel
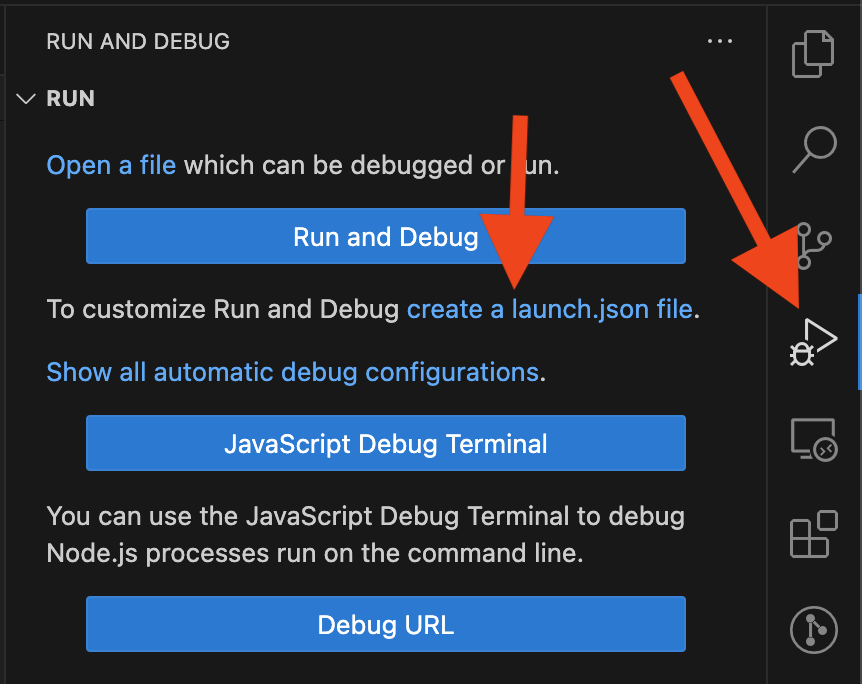
If you have the launch configuration file you can move to the next step. Otherwise go to Run and Build panel and click create a launch.json file:
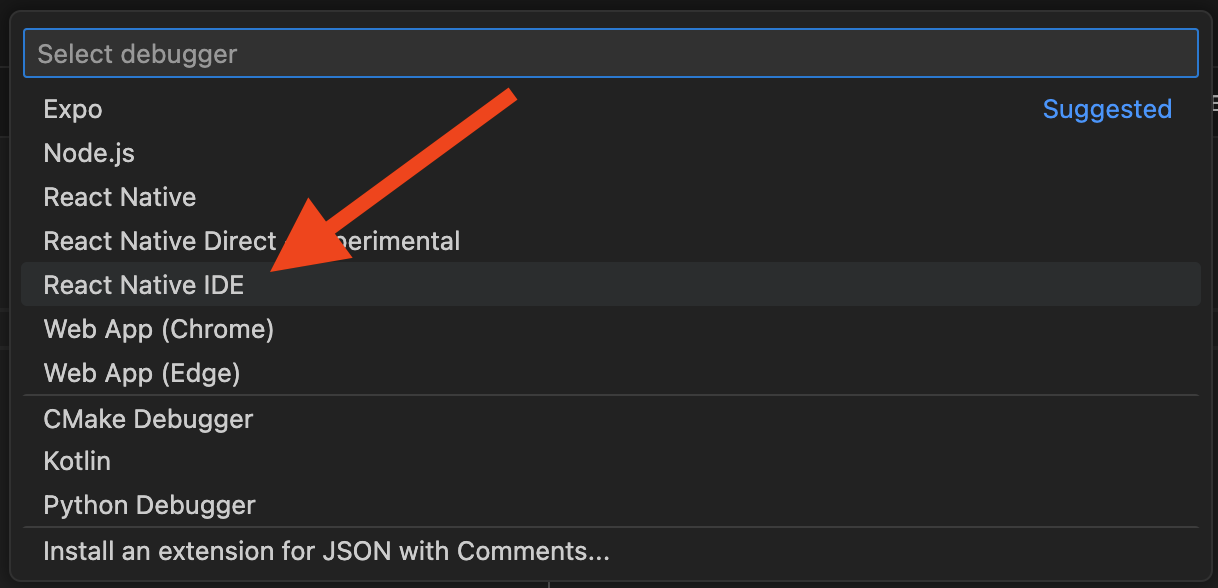
Then, select Radon IDE from the dropdown:
This will create a new file under your workspace directory: .vscode/launch.json – this file should be added to version control (git) as it carries configuration that is specific to your project setup rather than user specific editor settings.
Here is how your launch json file in should look like after this step:
{
  "version": "0.2.0",
  "configurations": [
    {
      "type": "radon-ide",
      "request": "launch",
      "name": "Radon IDE panel",
      "ios": {
        "configuration": "Debug"
      },
      "android": {
        "buildType": "debug"
      }
    }
  ]
}
Adding Radon IDE launch configuration by editing launch.json file
This step is only necessary if you already had launch configuration.
In that scenario, you'll need to open .vscode/launch.json and add the following object to configurations array:
{
  "type": "radon-ide",
  "request": "launch",
  "name": "Radon IDE panel" // The name could be changed
}
Make sure there is only one configuration with type radon-ide in your configurations array.
See the sample launch.json from the above step to make sure the format of the file is correct.
Customizing Radon IDE build settings
Launch configuration offers a number of options that can be listed when editing the radon-ide entry in VS Code thanks to code completion (IntelliSense).
Along with the code completion, documentation is provided for individual options.
Below we list the currently present options.
iOS Build configuration
Radon IDE builds your app for both Android and iOS.
If you have a custom build scheme configured in your project, and want to use it instead of the default one, you can specify that using the ios object in the configuration section.
The following attributes can be set within the ios object:
| Attribute | Description |
|---|---|
| scheme | Scheme name (from xcode project) the IDE will use for iOS builds. Defaults to xcworkspace base file name. |
| configuration | Build configuration name (from xcode project) the IDE will use for iOS builds. Defaults to "Debug". |
| launchArguments | Arguments passed to the app when launching it. |
Here is how the launch configuration could look like with some custom iOS build options:
{
  "version": "0.2.0",
  "configurations": [
    {
      "type": "radon-ide",
      "request": "launch",
      "name": "Radon IDE panel",
      "ios": {
        "scheme": "AcmeApp",
        "configuration": "Staging",
        "launchArguments": ["-FIRDebugEnabled"]
      }
    }
  ]
}
Android build configuration
Much like in the case of iOS, Android can also be configured to use a different target for builds we'd run on the emulator.
Similarly, you add "android" entry to the configuration object:
| Attribute | Description |
|---|---|
| buildType | Android's build type used when building with Gradle. Defaults to "debug". |
| productFlavor | Android's product flavor used when building with Gradle, not set by default. |
Below is an example of how the launch.json file could look like with android variant customized:
{
  "version": "0.2.0",
  "configurations": [
    {
      "type": "radon-ide",
      "request": "launch",
      "name": "Radon IDE panel",
      "android": {
        "buildType": "debug",
        "productFlavor": "staging"
      }
    }
  ]
}
Configuring custom builds
Instead of letting Radon IDE build your app, you can use scripts (customBuild option) or Expo
Application Services (EAS) (eas option) to do it. Both customBuild and eas are objects having ios and android optional
keys. You can't specify both a custom script and EAS build
options for a single platform.
Using customBuild
The requirement for scripts is to output the absolute path to the built app as
the last line of the standard output. If multiple paths are provided, just the first one is used. The path should point to .app, .apk (for iOS and Android consecutively), or .tar.gz archive, which must contain one of the previous.
If custom fingerprint script is used, it should output fingerprint (a string identifying the build) as the last line of the standard output. When fingerprint changes between invocations, Radon IDE will rebuild the project. The IDE runs fingerprint quite frequently (i.e., on every file save), so this process should be fast and avoid over the network communication.
customBuild.ios and customBuild.android have the following structure with
optional keys that can be used independently:
| Attribute | Description |
|---|---|
| buildCommand | String, specifies a command used for building. |
| fingerprintCommand | String, specifies a command used for creating fingerprint. |
Example:
{
  "version": "0.2.0",
  "configurations": [
    {
      "type": "radon-ide",
      "request": "launch",
      "name": "Radon IDE panel",
      "customBuild": {
        "android": { "buildCommand": "npm run build:ftp-fetch-android" }
        "ios": {
          "buildCommand": "npm run build:ftp-fetch-ios",
          "fingerprintCommand": "date '+%Y-%m-%d'"
        }
      }
    }
  ]
}
Example with EAS local build:
{
  "version": "0.2.0",
  "configurations": [
    {
      "type": "radon-ide",
      "request": "launch",
      "name": "Radon IDE panel",
      "customBuild": {
        "ios": {
          "buildCommand": "npx eas build --platform ios --profile development --local --non-interactive"
        },
        "android": {
          "buildCommand": "npx eas build --platform android --profile development --local --non-interactive"
        }
      }
    }
  ]
}
Using eas
eas.ios and eas.android are objects taking keys:
| Attribute | Description |
|---|---|
| profile | Required, used for selecting builds suitable for running in simulators. |
| buildUUID | When specified, the build with the specified ID will be used. Otherwise, Radon IDE will attempt to find a compatible build and use that. |
| local | When set to true, passes the --local flag to eas build in order to build the application locally. See the EAS Build docs for details. |
Below is an example that replaces iOS and Android local builds with builds from EAS:
{
  "version": "0.2.0",
  "configurations": [
    {
      "type": "radon-ide",
      "request": "launch",
      "name": "Radon IDE panel",
      "eas": {
        "ios": {
          "profile": "development"
        },
        "android": {
          "profile": "development",
          "buildUUID": "40466d0a-96fa-5d9c-80db-d055e78023bd"
        }
      }
    }
  ]
}
Other settings
Here, we list other attributes that can be configured using launch configuration which don't fit in any of the above categories:
| Attribute | Description |
|---|---|
| appRoot | Location of the React Native application root folder relative to the workspace. This is used for monorepo type setups when the workspace root is not the root of the React Native project. The IDE extension tries to locate the React Native application root automatically, but in case it fails to do so (i.e. there are multiple applications defined in the workspace), you can use this setting to override the location. |
| env | Environment variables to be passed to all build/run commands that the IDE is launching. |
| metroConfigPath | Path to metro config relative to the workspace. By default it tries to find metro.config.js or metro.config.ts. |
| metroPort | Port number that will be used by Metro bundler. If not specified, a free port will be automatically chosen. |
| isExpo | Boolean that can be set to true if IDE doesn't automatically detect the project should use Expo CLI. By default, the IDE tries to detect whether project is Expo-based or based on the React Native community CLI, so in most of the cases this option shouldn't be needed. |
| usePrebuild | Boolean that when set to true makes Radon IDE run expo prebuild command before building the app and when set to false Radon IDE will always skip it. By default, Radon uses Prebuild for projects with expo dev-client and skips it for other projects. |
| useNativeNetworkInspector | When set to true, Radon will use the Native ("Fusebox") Network Inspector implementation introduced in React Native 0.83.0. Note that this is only supported on React Native 0.83.0 and newer, and might not intercept network messages on earlier versions. |
| expoStartArgs | Extra arguments to pass to Expo start command. (e.g. ["--scheme", "your_scheme"]). |
| packageManager | Package manager used for the project. Available options include: npm, yarn, pnpm, bun. |
| disableNativeBuildStaleChecks | When set to true, Radon will not run fingerprint checks on reloads and after file changes that would detect whether the native code needs to be rebuilt. |
| useOldDevtools | Defaults to false for React Native versions 0.76 and newer. When set to true, falls back to the old devtools implementation that may be necessary on some setups. |
| useCustomJSDebugger | When set to true, Radon will use a custom implementation of the JavaScript debugger. This is an experimental feature, use with caution. |
Below is a sample launch.json config file with appRoot, metroConfigPath, and env setting specified:
{
  "version": "0.2.0",
  "configurations": [
    {
      "type": "radon-ide",
      "request": "launch",
      "name": "Radon IDE panel",
      "appRoot": "packages/mobile",
      "metroConfigPath": "metro.config.dev.js",
      "env": {
        "MY_SECRET_KEY": "bananas"
      }
    }
  ]
}