Development
Repository structure and project architecture
Radon IDE consist of a number of modules we are outlining below. It is useful to understand this architecture a bit more before contributing, so that it is cleaner which module is responsible for what part of the functionality:
- Main vscode extension code – this is the entry point for the extension that is booted up in a separate process by vscode. The code resides under
packages/vscode-extensionwith the main entry point beingpackages/vscode-extension/src/extension.tsfile. The extension code is responsible for orchestrating all actions with external process such as launching builds, as well as handling communication between the frontend and vscode APIs. - Extension frontend – this is a web application written in React. Since it shares some code with the main extension it resides in the same location –
packages/vscode-extension, but most of its code is located underpackages/vscode-extension/src/webview. Vscode launches the frontend portion using iframe, which enforces some limitations on what the frontend app can do (i.e. can't launch external processes directly). For this reason, most of the logic relies on calling to the main extension. - Simulator server – this code lives in a separate repository which isn't open source. It implements a server application that communicates with iOS simulator and Android emulator processes. The server is controlled from the main extension code which communicates with it via standard input/output. Currently simulator server is distributed as prebuilt binary.
- NPM package radon-ide – this package defines interface for the preview functionality which allows for components to be developed in isolation. Its code is placed under
packages/radon-ide. - Test applications – live in separate radon-ide-test-apps repo – serve a purpose of verifying the IDE works properly under different setups.
Prerequisites
Make sure you have a React Native environment properly setup before configuring Radon IDE for development.
Follow Set Up Your Environment from the official React Native documentation.
Setup requires (but is not limited to) installing the following items:
- Node.js (18.0.0 or higher)
- Xcode (latest stable)
- Android Studio (latest stable)
- Cocoapods
Development setup
In order to run the extension in development mode, follow the steps below:
1. Clone the repository
git clone git@github.com:software-mansion/radon-ide.git
2. Install NPM dependencies in packages/vscode-extension folder
Inside packages/vscode-extension run:
npm install
3. Prepare simulator server build
Simulator server repository is not open sourced but we have a pre-build binaries published on the GitHub releases page. There's a script that fetches the latest version of the binaries from the releases page on GitHub – you can run it using the following command:
npm run build:sim-server-debug
Note that some changes in the extension may depend on changes made to the simulator server, so you occasionally may need to re-run this script, for example when switching git branches.
4. Open extension project in Visual Studio Code
It is necessary that you open exactly the main extension folder rather than the whole repository, as it contains project specific run configuration for launching the extension in development mode.
You can do it by opening new window in Visual Studio Code and using File > Open Folder option, then select packages/vscode-extension, or if you have vscode's command line tool installed you can open it using command:
code packages/vscode-extension
5. Launch vscode development host with development version of the extension
This can only be done from withing Visual Studio Code.
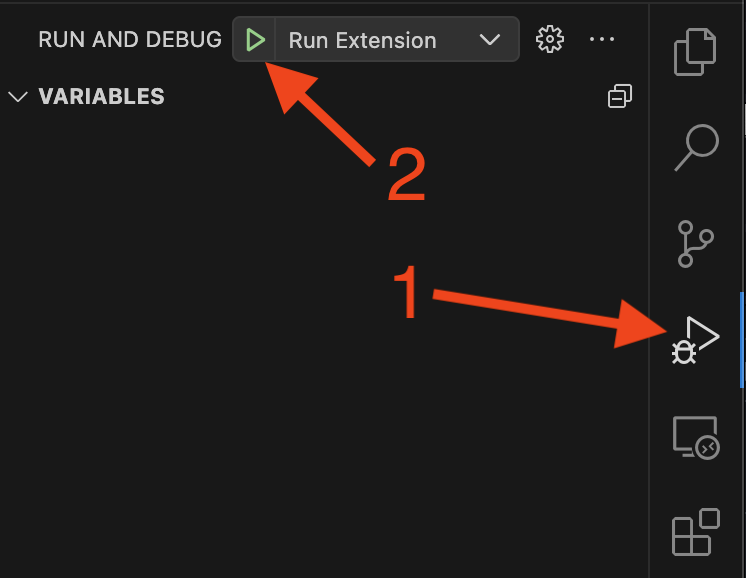
With the extension project open, go to Run and Debug panel and click "Start Debugging" button next to "Run Extension" configuration:

Running this configuration will result in the new vscode window being opened. This new window is titled "[Extension Development Host]" and is the only window that has the development version of the extension loaded – you should use it to open your React Native project, or try some of the test apps from radon-ide-test-apps repo.

NOTE: Visual Studio Code by default will open new folders in a new windows, so since you want to open the project on the same window as the extension host, you should disable that option in the settings. You can do it by going to
Settingsand searching forwindow.openFoldersInNewWindowand setting it tooff.

6. Develop the extension!
Frontend code is setup with hot reload, so changes made to frontend code will update live.
Code changes made to the main extension, requires restarting the extension project which will result in the Extension Host window reloading. You can use Debug Tool Bar to restart the project:

For main extension code, you can set breakpoints in vscode and use debugger normally, logs will appear in the Debug Console panel. Unfortunately debugging isn't available for the frontend code, however you can use vscode's builtin chrome devtools to see logs or interact with the frontend portion of the project – for this you'll need to run command "Developer: Open Webview Developer Tools" from the command palette in the Extension Host window.